

In the raid instance Magtheridon’s Chamber of WoW: Burning Crusade Classic, you will face the cult enemy Magtheridon. The 25-player raid dungeon is located on Hellfire Peninsula and is quite a bit trickier than High King Maulgar and Gruul. We tell you how to defeat the hardest raid boss of TBC Classic Phase 1.
Besides the Gruul’s Lair instance, Magtheridon’s Dungeon is the second entry instance for 25-player raids in Phase 1 of WoW: Burning Crusade Classic. It is reminiscent of Onyxia’s Lair, where you also found only a few trash mobs and one boss. This raid doesn’t require any pre-quests, you can just walk right in. But beware, first get the appropriate equipment for this raid instance. Epic quality items, such as those from Karazhan or the Heroic instances, are an absolute must. Some blue armor pieces are acceptable, though. Also pack useful consumable items such as potions, elixirs or vials, and food.
Entrance and Raid Setup
 The entrance to the instance is located deep down on the western side of Hellfire Citadel. However, do not enter the dungeon without thinking carefully about your setup.
- With Magtheridon, you will need enough tanks to bind the five Hellfire Channelers in Phase 1. By misdirecting fighters, you can quickly bring distant channelers to your tanks. Then, for example, the two tanks that don’t take Magtheridon each take two adds. Alternatively, of course, you can work with five tanks at once, with the adds that are supposed to die first also being fueled by, say, offensively oriented warriors.
- It’s also helpful to have three to four Warlocks to take care of the summoned Abyssal creatures via Banish or Fear. Alternatively, they can be ice-trapped by hunters.
- The DARK IMPROVEMENT as well as the SHADOWFLASH SALVES of the channelers must be interrupted. If you park two of the adds at one of the tanks with enough distance to the raid, you can ignore their spells for now.
Pack eight to ten healers for your first visit to the chamber. You can expect some enormously high raid damage.
The Trash: The Hellfire Wardens
After you have assembled the group, you can venture into the instance with confidence. Before Magtheridon, however, you must eliminate four groups of trash mobs. These consist of three hellfire wardens each, which you cannot avoid. One group wanders around as a patrol, while the other three are spread out around Magtheridon’s chamber. The approach is always the same. Deploy a tank on each of the three enemies and assign two permanent healers to each tank.
 The remaining healers take care of the raid, while other potential tanks either deal damage or keep the escaping orcs away from the healers. You pull the orc you want to kill up to the group, while the remaining two stand away from the others. That way, three volleys won’t hit the entire raid at once. Make sure that the patrol doesn’t get too close to you! An unintentional pull will quickly end in a wipe. Once the first enemy is defeated, bring the next mob up.
Pay particular attention to the disruptive abilities of the dark orcs. They FEAR random players, sometimes including the tank in question, cast a SHADOWFLASH SALVE, and distribute DoTs. The SHADOWFLASH SALVE interrupts rogues, warriors and co. as often as possible. Since the casting time is very short, the Curse of Languages is recommended here. The SHADOWWORD: PAIN removes characters with the corresponding abilities, but it’s better to keep your hands off the INSTABLE BREAK. Should you want to clean it, you will receive about 5,000 shadow damage as well as a short silence effect. Attention: Run out of the FIRE RAIN!
Note: Of course, you can also pull all three guards together and cleave them out of existence at the same time. In that case, however, interrupting the SHADOW FLASH SALVE must work extremely well on all three targets.
The first combat phase
After the trash mobs are defeated, you can head to the Magtheridon chamber. Don’t worry, the five channelers of hellfire won’t attack you until you deliver the first strike. You’ll need tanks for each of these five channelers, and you can choose whether to assign one tank to each channeler or to attach two channelers to individual tanks. In either case, the tanks will need assigned healers.
 Your goal in phase 1 is to defeat all five mobs within a short time and without any deaths, since Magtheridon intervenes two minutes after the start of the fight. Where you tank the mobs depends on your strategy. With five tanks, you can tank the mobs at the respective cubes and the raid works its way from cube to cube. With three tanks, a 2-camp strategy is a good idea. Draw three channelers through two tanks together at one point, with the main tank that can take the most grabbing two nasties. The third tank in turn parks itself at the opposite end of the chamber with its healers and the other two channelers. Hunters help with misdirection on the pull.
Start – with strategy 1 – with the channeler in the south first and then work your way counterclockwise around the room. A druid tank is especially recommended for the first channeler, as it can generate threat very quickly. A hunter additionally uses misdirection, but lets the ability lapse for a few seconds. This guarantees the timely decay to Magtheridon’s outburst. The tank in the southeast should then also be the main tank to take on Magtheridon later. Since the Hellfire channeler at this position is the second to bite the dust, the main tank is guaranteed to be free for Magtheridon after the two minutes. The same is true if you knock out the main tank’s two channelers first in the 2-camp strategy.
Beware of the burning demons
Unfortunately, the five channelers prove to be quite exhausting Magtheridon’s bosses. Similar to the trash mobs, they also have a SHADOW FLASH SALVE that you can and should interrupt. Furthermore they try to heal each other up with DARK IMPROVEMENT. This spell must be interrupted in any case, because you don’t have unlimited time. Since DARK IMPROVEMENT has a range of 60 meters, you must place two interrupters at each of the channelers that are within range of the current focus target.
The advantage of the 2-camp strategy is that you can completely ignore the two channelers that are refueled away from the raid at first. However, in order to do so, the interrupts on the three enemies that are tanked during the raid must work optimally. The curse of languages is also immensely important here.
Furthermore, the channelers occasionally fear a random healer or damage class. Use Fear Spell Protection and Earthblast Totem to limit the damage. Therefore, assign two healers to each tank if possible. Unfortunately for you, Magtheridon’s minions also summon Burning Abyss on random players. These should be banished or feared by Witchers as soon as possible, otherwise you risk the death of the healers from their fire damage. Last but not least, the remaining channelers get a bit stronger with each death of one of their comrades. Therefore, the tanks that occupy the last two orcs need a high level of healing and must not die under any circumstances. Keep in mind that after two minutes Magtheridon will break out, so the main tank will need some healing as well.
The fight against Magtheridon begins!
Shortly after defeating the third orc in the northeast, Magtheridon will approximately erupt. At this point, the misdirection of a hunter must be ready and placed on the main tank. This one places itself against the southeastern wall of the chamber; after all, there are no more channelers there. The hunter shoots the boss three times, generating threat for the tank. The tank then begins its task and is supported by at least four healers.
The remaining players take on the last channelers and bring them down as quickly as possible. The sorcerers continue to make sure that the burning Abyss creatures are kept away from the group. After some time, they will disappear as if by themselves. After that, it’s on to the boss. No players stay next to the tank, otherwise SPLITING the boss will destroy you. Stay away from the fire in the room, it will only do unnecessary damage to you. Don’t be confused by his EARTHQUAKE, it doesn’t do any damage, and only prevents you from casting spells. However, the tank will not receive any blows during this time either.
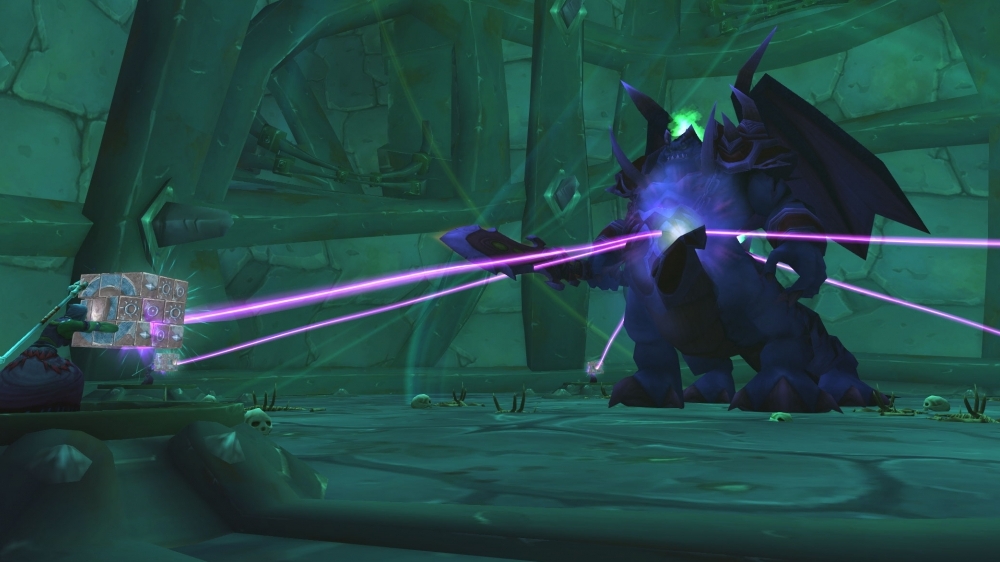
The dice are the key to success
Surely you have already noticed the cubes, which were operated by the channelers before the pull. These are of great importance for the fight. About every 50 seconds, Magtheridon begins to cast a PRESSURE NOVA. This does 12,500 fire damage over ten seconds, killing most players. Fortunately, it can be stopped by rolling the dice. Once Magtheridon casts his Nova, each die must be clicked once by a free player.
 Do not click it more than once or before the nova is cast, or the plan will fail. If each player reacts in time, the nova is stopped and you are saved for the time being. While rolling the dice, players receive 800 shadow damage every second. So you must have the maximum of your hit points beforehand. Once the nova is prevented, you can cancel the operation of the cube. After that, by the way, you’ll receive a mind debuff that lasts for three minutes. As long as you have this debuff, you cannot click a cube. This requires swapping the “clickers”. So divide up several groups of 5 to take care of the dice one by one. The players whose turn it is next should get close to their cube early in the game and allow for nasties like the EARTHQUAKE.
Also important: If a character dies who should have been operating a cube shortly, this must be communicated quickly and clearly so that you can organize a replacement in good time. If even one die is clicked too early, repeatedly, or not at all, it’s very definitely off to the spiritual healer.
The prison collapses
When Magtheridon is at 30 percent of his hit points, he causes the walls of his chamber to collapse. Each player receives around 5,000 to 6,000 damage and should therefore have their full hit points beforehand. After that, you will have to bandage yourself or take a health stone.
Don’t wait for healing, this is for the time being for the main tank and the players who have to take care of the cubes in the next PRESSURE NOVA.
IMPORTANT:
- Do not bring Magtheridon below 30 percent health during a PRESSURE NOVA.
- The collapse of the ceiling is usually immediately followed by a PRESSURE NOVA. So the players now assigned must be standing near their cube before the collapse and be healed immediately.
Occasionally, debris will still fall from the ceiling, which will immediately knock you off your feet. Therefore, always keep an eye out for anything sailing from the ceiling. Avoid getting to your cube too early now. Because if the ceiling collapse happens there, you’ll have to move away from your cube. In the worst case, the PRESSURE NOVA will go off shortly after and you will be too late for the interruption.
The most important skills at a glance
Two minutes after your attack on the Hellfire channelers, Magtheridon intervenes. First, however, kill the orcs, then Magtheridon. Pay special attention to the PRESSURE NOVA, which must be prevented immediately by rolling the dice.
Skills – Channeler:
- SHADOWFLASH SALVE: Hits any player within 30 yards for about 1,800 shadow damage. May be interrupted.
- DARK IMPROVEMENT: The channeler heals itself by one-third of its hit points. Must be interrupted.
- SOUL TRANSFER: If an Orc dies, those remaining receive a buff that increases their damage and reduces the casting time of their spells.
Skills – Magtheridon:
- SPLIT: Hits the main tank and players near it. Therefore, stay away from the tank.
- EARTHQUAKE: Players are thrown around, but receive no damage.
- PRESSURE NOVA: Deals 2,500 fire damage every two seconds for ten seconds. Must be prevented by rolling the dice.
What is WoW Classic?
World of Warcraft Classic is a true recreation of the original WoW as you know it from 2006. All parts of the game – from combat mechanics and talent trees to character models and zones – have been recreated, contributing to the authentic experience.
Getting Started
All players with an active World of Warcraft subscription or game time on their accounts have access to WoW Classic at no additional cost.
- Open the Blizzard Battle.net Desktop App and select World of Warcraft from the menu.
- Select World of Warcraft Classic from the Version menu. If you have more than one World of Warcraft account, you’ll see a second Account drop-down list. In this column, select the active account you want to play with.
- Click the Install button. The progress bar will tell you when your game is ready to play.
- Click the Play button when the installation is complete.
You will need to select the realm you want to play on from several different realm types. Make sure you choose the same realm as your friends – in World of Warcraft Classic, you can only group with characters that are on the same realm as you!
Heroes&WIKI, WoW Classic, World of Warcraft Classic, WoW Classic Guide, WoW Classic Guides