

After the Lich King was sent to the eternal hunting grounds with World of Warcraft, both in-game and in Story: Cataclysm, the rebuilding of the Eastern and Western Plaguelands is in full swing. The Alliance and Horde have established new bases and are attempting to destroy the last remnants of the Scourge. In Scholomance, however, there are still more than enough of the undead fellows. In our guide you will learn how to free the bastion from the villains and what loot you can wrest from them.
Preparation
Scholomance is still located on a small island in Darrowmer Lake – southeast of the Western Plaguelands. In the meantime, both the Alliance and the Horde have set up shop near Andorhal and positioned Flight Masters there as well. You can either reach the instance via the waterway or use the bridge to the south. A key is no longer required to enter the instance.
Kirtonos the Herald (1)
Take the quests at the beginning of the dungeon. During the quest “Kirtonos the Herald”, you will receive a vial of Innocent’s Blood, which you need to summon the boss. If you have already completed the quest, look for the Succubus Blood Servant of Kirtonos in the Relic Shrine – the first room where there are several groups of enemies – and kill the demoness. She will leave you a blood of innocents as loot. Then continue your way through the iron gate to the north. In the chamber of summoning, turn right and enter a small balcony with a herald’s cauldron. Use the pan with the Blood of the Innocents and Kirtonos will appear shortly after. The herald keeps switching back and forth between vampire and normal form. Depending on which form he is in, he has different abilities. As a vampire, he disarms the tank and applies an armor-weakening blood effect to him. Since he also has multiple abilities that hit all enemies before the boss, all other party members spread out behind Kirtonos. In its normal form, the Heold casts a Curse of Tongues on random targets. Remove the curse when you have the chance. To do this, he repeatedly summons Shadowbolt volleys that damage the entire party. all other party members spread out behind Kirtonos. In its normal form, the Heold casts a Curse of Tongues on random targets. Remove the curse when you have the chance. To do this, he repeatedly summons Shadow Lightning volleys that deal damage to the entire party. All other party members spread out behind Kirtonos. In its normal form, the Heold casts a Curse of Tongues on random targets. Remove the curse when you have the chance. To do this, he repeatedly summons Shadow Bolt volleys that damage the entire party.
Abilities of Kirtonos the Herald
| Capability | Effect |
| Disarm (Vampire Form) | Disarms the tank for 10 seconds. |
| Wing Flap (Vampire Form) | Knocks back players who are in a cone in front of the boss. |
| Dive (Vampire Form) | Damages and stuns players in a cone in front of Kirtonos for 2 seconds. |
| Pierce Armor (Vampire Form) | Reduces the tank’s armor by half for 10 seconds. |
| Shadow Bolt Volley | Inflicts Shadow damage to all players. |
| curse of languages | Increases cast time of afflicted by 50 percent. Curse. |
| Transform Kirtonos | Kirtonos transforms into a vampire or his undead form. |
Jandice Barov (2)
On the western wall of the next room is the path to the basement. There is also Jandice Barov next to a bunch of undead. She herself repeatedly conjures up illusions that you can only turn off with direct attacks. Area effects are useless here. She also distributes a blood curse that increases the physical damage taken by the affected person. You should remove this curse from the tank in particular if possible.
Blood Rib (3)
Back in the large central room, head south into the large ossuary. There you fight your way through the animal guides and their dragon pups to the stairs on the other side and go into another basement. Bloodrib is waiting for you there, surrounded by numerous bone constructs. Kill as many constructs as possible before attacking Bloodrib. The boss occasionally knocks back the tank and stuns nearby players with a thunder of war. Healers should stay as far away from Bloodrib as possible so they aren’t interrupted in their healing.

Ra’s Frostwhisper (4)
Exit the Great Ossuary again and stay to the right to enter the screening room. By the way, Marduk Schwarzborn and Vectus are there, which you have to kill for the “Alexis Gambit” job. The two opponents are only to be killed for this quest, because they do not have any interesting loot. For more interesting opponents, go through the door at the other end of the room. At the bottom of the stairs, the door to Ras Frostwhisper’s laboratory opens. Eliminate the groups on the left and right of the room, then attack Ras Frostwhisper. Healers and ranged fighters keep as far away from the boss as possible to avoid getting caught by his freezing cold nova. Be prepared for melee fighters to have Frostwhisper’s Frost Armor chill effect increase the time between their attacks by 100 percent.
Lorekeeper Polkelt (5)
From the projection room you now go to the director’s study. The area consists of a lower and an upper level. Three chambers branch off from each level to the north, east and south. The order in which you clean the individual chambers is up to you. Once you have swept all rooms empty, Dark Master Gandling will appear. In the upper northern chamber is Lorekeeper Polkelt, surrounded by a pile of walking corpses. While you eliminate the corpses, you have to make sure that they cause a lot of damage in bulk, and sometimes get up again after they die and attack you again. The keeper of knowledge mainly affects you with diseases that you should remove if possible. Also a debuff belongs to his repertoire, which reduces the armor of all nearby players. Players affected by the fleeting infection immediately run out of the group, dealing high damage to their fellow players.
Doctor Theolen Krastinov (6)
In the eastern upper room is Doctor Theolen Krastinov. He is guarded by a group of sick ghouls. Watch out for these ghouls, as their poison aura deals damage to all nearby players – quickly fatal if there are too many ghouls at once. Even after their death, the ghouls leave behind a cloud of poison that you avoid. When the room is free of ghouls and the clouds of disease have cleared, you attack the doctor. Since the boss hits very quickly with two one-handed weapons, your healer is prepared for high damage to the tank. When the doctor reaches 50 percent of his life energy, he increases his attack speed by 60 percent in a fit of rage, which increases the damage done to the tank enormously.
Instructor Malicia (7)
The Southern Chamber is the seat of Instructor Malicia. If you kill the occultists in front of the boss, they turn into dark shadows that you can only do with magic attacks. They are immune to melee attacks. The instructor herself applies snare and damage-over-time spells to random players, but you can remove them with magic cleansing abilities. She also has various self-healing abilities. Interrupt heals and flash heals if possible, otherwise the fight will take a long time for low-damage groups.
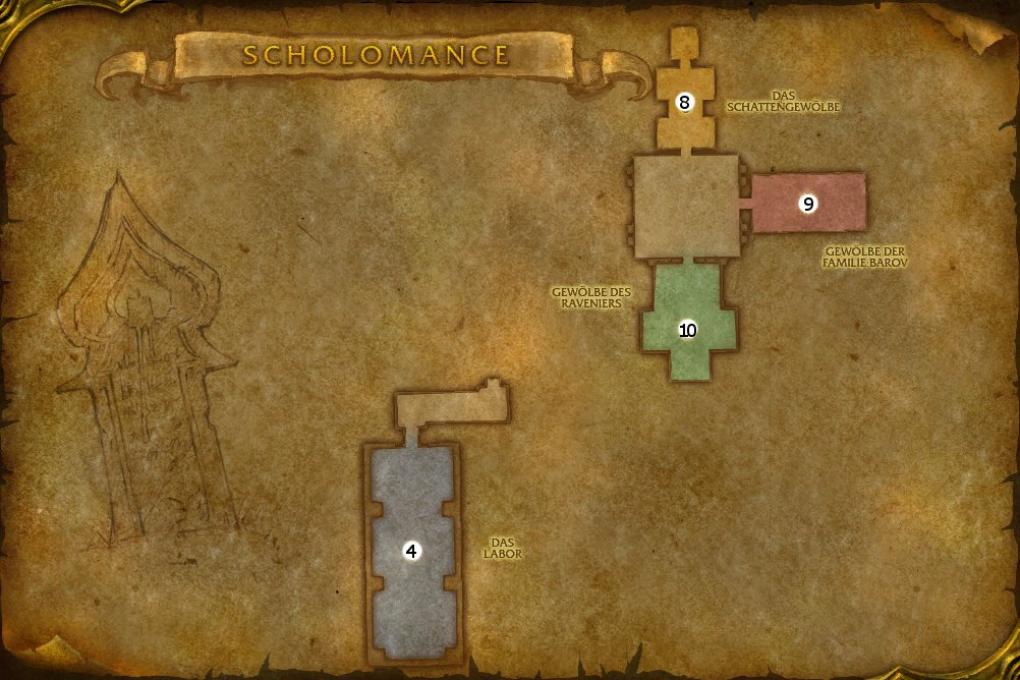
Lady Illucia Barov (8)
In the lower northern room, you will encounter some skeleton mages that you kill one by one. Lady Illucia Barov is waiting for you at the end of the room. She occasionally curses a random player, inflicting Shadow damage over time. In addition, she repeatedly casts a silence effect on the entire group that lasts for five seconds. Your healers in particular have to adjust to this ability. She inflicts high damage to the tank with her shadow shock. Occasionally, she attempts to control the mind of a random party member. If you succeed, you keep the taken player at bay with fear or other opponent control abilities.
Lord Alexei Barov (9)
Before you fight Alexei Barov in the eastern lower coven, kill the two Risen guards in the front area. The lord is accompanied by two other guards who you have to fight with him. If your group is accompanied by a priest, he can tie up one of the guards so that the damage on the tank does not increase too much. Otherwise you have to kill the guards quickly and then focus on Barov. He is surrounded by an aura that deals 100 damage to all nearby players every 2 seconds. He also uses a shroud of shadow to reduce the effectiveness of any healing effects on nearby players by 60 percent for 15 seconds. If possible, this curse should be removed by a party member. Its Immolate inflicts Fire damage over 15 seconds on its target. This is a magical effect that can also be cleaned.
The Ravenian (10)
In the south you enter the Ravenian Vault, where the Ravenian and some skeletons are. Dispose of the skeletons and then take on the Ravenian. The tank pulls the boss against the wall and turns him with his back to the group. This will prevent you from getting caught by his cleave abilities and the tank won’t be knocked across the room by his smashing away.