

In the WoW region Feralas, heroes of levels 50 to 60 will find adventures in the 5-player instance Bleak Quarry. You can find our guide to the dungeon, which is divided into three parts, here.
Preparation
Bleak Quarry is still divided into the Usher Bark Quarter (East), the Capital Gardens (West), and Gordokhallen (North). In Gordokhallen, you can still perform the so-called “Tribute Run”, which gives you additional loot from the boss – to do this, you have to leave the individual guards and Hauptman Krombruch alive and march through to the final boss. We’ll tell you how to defeat – or bypass – the bosses and what loot you can grab in our guide.
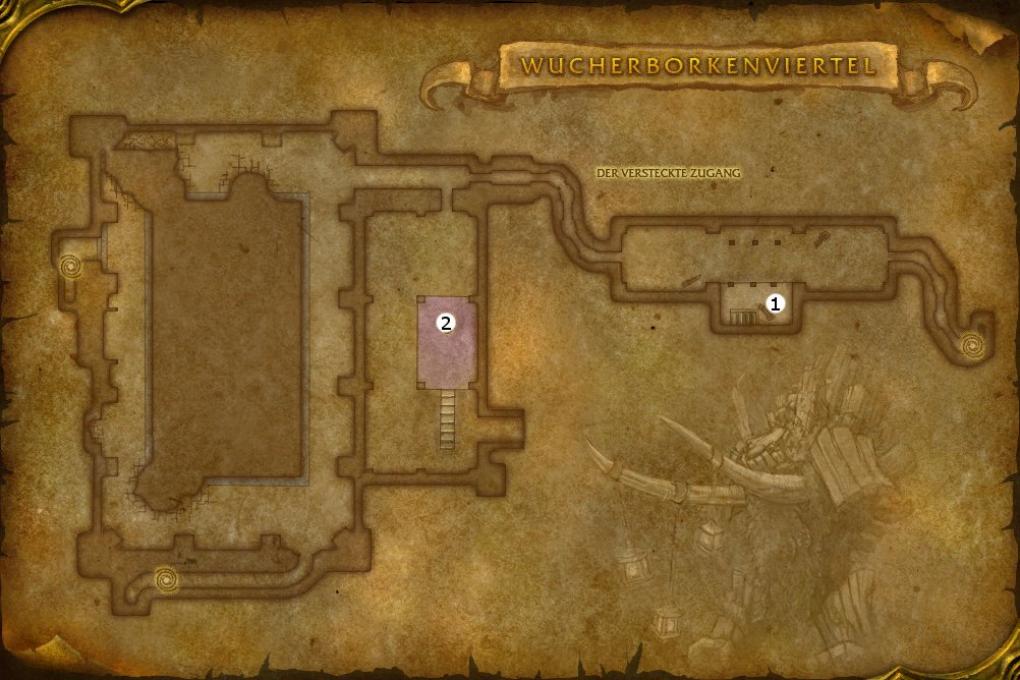
Bleak Quarry – East (The Usury Bork Quarter)
Pusillin (1) (Required for the quest: Pusillin the Thief)
After entering the instance, turn to the left. There you will notice a small imp named Pusillin. Talk to him and follow him. He will lead you through some groups of plants, trees and demons. Watch out for the rampant plant capsules on the ground – if you touch them, they will release a cloud of poison. Once you enter the corridor to the east, you’ll have to watch out for invisible shadow stalkers to do so. On his way, Pusillin will stop again and again, and you’ll have to talk to him again to make him continue on his way. In order not to lose sight of him, you can mark him with a sign. To do this, target the wretch, right-click on his portrait and choose the “Raid Symbol” option. Which symbol you choose is up to you. Once you’ve arrived at Pusillin’s lair, talk to him one last time. The Imp will summon four additional Familiars to assist him in battle. Your tank binds all enemies to him, and the ranged fighters keep as much distance as possible. Pusillin and his minions keep throwing fireballs and fire blasts at you. He also uses a blast wave as an area spell that reduces the movement speed of those hit for six seconds.
Skills of Pusillin
| Capability | Effect |
| blast wave | An area of effect that deals Fire damage to all nearby players and slows their movement speed for 6 seconds. |
| fireball | Deals fire damage. |
| fire blast | Deals fire damage. |
Lethtendris (2)
Leave Pusillin’s gallery and take the passage back towards the entrance. Before you get back on the loop, however, turn south and enter another room occupied by demons and a few Lashers. Clear the way to the ramp and you’ll be faced with the second boss of the Wucherbarkenviertel: Lethtendris and her imp Pimgib. The tank grabs both Lethtendris and her companion and binds them to himself. Your damage dealers will deal with the imp first and then deal with the warlock. Pimgib defends himself against his attackers with fireballs, blast waves and a flame buffer. Lethtendris repeatedly casts Void Bolts on the tank, dealing high Shadow damage. Her Shadowbitz salvos hit all nearby players. She also occasionally casts Immolate on the tank, dealing additional Fire damage every 3 seconds for 15 seconds. Melee fighters also watch out for their Thorn Curse, as the cursed target has a 50 percent chance of self-damage when attacked.
Abilities of Lethtendris
| Capability | Effect |
| fireball (pimgib) | Inflicts 160 Fire damage on the target. |
| Blast Wave ( Pimgib ) | Deals damage to nearby players and slows their movement speed for 6 seconds. |
| Flame Buffer (Pimgib) | Inflicts Fire damage on the target and increases their Fire damage taken by 20 points for 20 seconds. |
| Fire Blight ( Lethtendris ) | Burns the enemy for Fire damage, dealing Fire damage every 3 seconds for 15 seconds |
| Shadow Bolt Volley (Lethtendris) | Area attack that hits all players and deals shadow damage. |
| Void Bolt (Lethtendris) | Deals high shadow damage. |
| Curse of Tongues (Lethtendris) | Slows the target’s casting speed by 50 percent for 15 seconds |
| Curse of Thorns (Lethtendris) | The cursed target has a 50 percent chance to damage themselves when attacking. |
Hydrospawn (3)
There is a passage directly in the bottom wall next to the ramp that leads to Lethtendris. Fight your way through the satyr groups in the next room. Hydrospawn is in a small well in the center of the room. The Water Elemental occasionally reduces the stamina of nearby players by 10 percent. He also summons geysers that deal Frost damage and knock up nearby players. Don’t let these geysers throw you into more enemy groups. Finally, Hydrospawn has a Disarm attack that steals the tank’s weapon and knocks it back. When he reaches about 50 percent of his life energy, Hydrospawn summons two Hydrolings with their Hydro Beam attacks, reducing the movement speed of those hit by 60 percent and knocking them back.
Hydrospawn Abilities
| Capability | Effect |
| submerge | Stacking debuff that reduces the affected person’s Stamina by 10 points per charge. |
| Massive geyser | Hydrospawn summons a geyser that throws players into the air and deals Frost damage. |
| spring tide | Disarms the target and knocks them back. |
| Summon Hydroling | Hydrospawn summons two Hydrolings that slow their targets’ movement speed by 60 percent and knock them back. |
Zevrim Thornhoof (4)
Go further north and follow the passage to the upper area. There, the next boss Zevrim Thornhoof is waiting for you at his altar. To get to the final boss of the instance, you need to kill Thornhoof. A random player will repeatedly suffer the debuff “Intense Pain”, which inflicts shadow damage every 3 seconds for 15 seconds. Thornhoof will also sacrifice a random player on his altar for 6 seconds, dealing heavy damage. The sacrificed player must be heavily healed by the healer during this time.
Alzzin the Wildshaper (5)
Return to the pool and now choose the right passage to the conservatory. There, Ironbark the Redeemed awaits you. On your way, keep an eye out for roving groups of enemies and fight them if they get too close. Then talk to Ironbark, who will open the door to the final boss after Thornhoof’s death. Follow Ironbark and step through the door into the shrine of Eldretharr. Fight your way through Wucherbarkcrusher on one side of the loop and you will face the final challenge of this instance section: Alzzin the Wildshaper. The boss transforms into a tree or a dire wolf at irregular intervals, gaining special abilities. In tree form, he repeatedly knocks back or disarms the tank. In dire wolf form, he mauls the tank and leaves behind a debuff that deals bleed damage every 2 seconds. In addition, his Sneak Bite deals increased damage. In normal form, Alzzin equips himself with spikes that deal damage to melee players per attack. He also drains mana from random players or deals damage over time with Wither. Also, when Alzzin reaches 50% of his hit points, he repeatedly summons some minions that you eliminate with area damage.
Tendris Weepingbark (6)
First, clear the circuit of Ironbark’s four wandering protectors so they don’t get in the way of your fight against Wuerbark. In order to fight Immol’thar later, you must first have eliminated all the pylons in the instance. The first one is located in the middle of the green area in the first part of this instance section. Eliminate the arcane elementals that have gathered around the pylon to destroy it. Then head west to Tendris Wucherbark, an ancient tree guardian. The tank turns the tree creature away from the party so that no other player is endangered by his cleave attack. During combat, he teleports random targets to him and entangles them with roots, rooting the target for up to 10 seconds and dealing damage every 3 seconds.
Magister Kalendris (7)
From the usury bark, now head back up the ramp and through the northern passageway into the courtyard of the highborn. Here a few ghosts await you, attacking you with frost attacks. Stay on the lower level and walk past the ramp until you spot Magister Kalendris on the outer wall to your left. The magister will pummel you with mind blasts and mind blows. He also dispenses the magic effect Shadow Word: Pain, which deals shadow damage to the target every 3 seconds for 18 seconds. If possible, your healer should remove this effect. However, his most important ability is that he repeatedly controls the mind of a randomly selected player.
Illyanna Raven Oak (8)
The ramp to the north leads to the upper area of the Highborn Courtyard. In the southwestern area, the huntress Illyanna Raven Oak and her companion Ferra await you. First, however, prepare the surrounding spirits of Eldreth so that they do not interfere with your fight against Illyanna. Take care of the bear Ferra first, so that he doesn’t stun you with his attack anymore. Illyanna’s shock shot stuns the entire party for a short time, so your healer will have to keep the party alive at all times. She also casts a multi-shot in an area in front of her. Except for the tank, everyone stays behind the boss. Move quickly out of Illyanna’s traps and volleys to avoid additional damage. After the fight, clear the rest of the upper area to destroy two more pylons in the southeast and northeast. Also visit the Ancient Shen’dralar in the east, because it will give you the task to destroy the
Immol’thar (9)
Now go back to the former seat of Tendris Wucherbark and use the door on the right. The passage behind it will lead you to Immol’thar’s prison. To turn off the force field around the boss, you need to take out two more pylons. These are located in the northeast and southwest of the circular area. Along the way, you will encounter arcane elementals patrolling. Be careful not to fight too many enemies at once, as they do high damage. Once the force field is turned off, turn your attention to the demon dog Immol’thar. The boss keeps summoning Immol’thar eyes, which you kill immediately. The tank pulls Immol’thar to the center of the circle, and the rest of the party spreads out behind the demon to avoid its cleave attack. The boss repeatedly throws an infected bite at the tank, increasing the tank’s physical damage taken. The healer has a lot to do here, as the boss hits the tank with high damage.
Prince Tortherrin (10)
Enter the Athenaeum through the corridor in the northeast. There, Prince Tortheldrin waits just below the gallery in the southwest of the room. He strikes very quickly and from time to time casts a whirlwind spell that hits all players within melee range. Ranged players and healers should therefore keep their distance from him. The tank is also occasionally flung across the room by Tortheldrin’s arcane attack and teleported to the prince by a summoning spell. Spellcasting classes – especially healers – should watch out for the boss’s counterspell. Important: If you want to visit the north wing of Dire Maul afterwards, you must do so via the main entrance. The passage from the Athanaeum to the North Wing has been closed with Cataclysm.
Guard Mol’dar (11)
You’ll find the heavily armored guard Mol’dar right at the beginning of the instance in the green area. He’s not there alone, however, so eliminate the Ogres and Mastiffs in the area before you get his attention. Once you have a clear path, turn your attention to the guard. Mol’dar will hit hard and break your tank with powerful blows and shield blows. Once his health is at about 50 percent, he goes into a frenzy for two minutes, increasing his damage and attack speed. As a healer or ranged fighter, stay in the melee area behind the guardian’s back to avoid his shield attack. He can and will only do this if a player is out of melee range. Still, you’ll have to be careful, because Mol’ Dar will occasionally turn around and hit a player in the face with his shield strike. If you decide to leave the final boss’s guard alive for better loot, ignore the green area and continue your way to the left.
Stomper Kreeg (12)
Now go up the ramp opposite the entrance and turn left. On the right side of the wall, behind a group of three ogres, is the drunken Stomper Kreeg, either taking his afternoon nap or dancing around drunk. For a drunken ogre, the Stomper has all sorts of abilities. Occasionally, he spits alcohol at the tank, reducing its hit chance by 75 percent. In addition, he casts a war thunder that hits all targets in melee range and knocks them back. Melee fighters must also be wary of his whirlwind. If you let him live, you can buy rare alcohol from him after you kill the king and become king yourself.
Guard Fengus (13)
Go through the archways in the west under the small pavilion, under which there is a small chest. Loot it to get the key to the door to the Gordok Courtyard. Guardian Fengus constantly patrols this area. Eliminate as many groups of ogres and mastiffs as necessary, and then take care of Fengus. He has the same abilities as Guardian Mol’dar, so the fight is exactly the same. Only the melee damage he deals is higher than that of his colleague. On the other hand, he doesn’t last as much because he has less health. However, to get better loot from King Gordok later, you can bypass the guardian and let him live.
Guard Slip’kik (14)
Use the key from Fengu’s chest to open the door to the Gordok Courtyard, and step into the passageway beyond. Some ogre warlocks with demonic companions await you here. Watch out for Kilroggs Swarm Eyes and eliminate them as soon as possible, otherwise they will summon Netherwalkers that will cause high group damage. Next, you’ll have to deal with a horde of vermin, which you’ll fight with area spells. The guard Slip’kik patrols the corridors of the room. If you attack her, the fight is the same as against Mol’dar and Fengus. If you want to keep the guard alive to get better loot from King Gordok later, use the trap with the blue question mark above it and wait for Slip’kik to run over it.
Leave the captain alive:
If you choose to let him live, get the quest “The Gordok Ogre Suit” from Knot Screwdriver in the corner of the room. Then fight your way up the ramp through the ogres and clear the middle platform of enemies. In the middle of the platform you will find a basket of Ogre Tannin. Loot it and kill the Gordok lone fighter summoned by it. Then return to Knotenschrauber and give him the tannin. With the ogre suit in your luggage, now run up the ramp and open the Gordok inner door. Eliminate the group of three ogres, put on the ogre suit and then talk to the captain. After a short conversation, convince the captain that guard Fengus insulted him, and Kromcrack angrily sneaks away,
Kill the captain:
If you want to kill the captain, go up the ramp and face the captain, who will be hostile to you without an ogre suit. The captain hits hard and occasionally reduces the tank’s healing by 50 percent. He also repeatedly makes the group flee in fear. Be careful not to run into enemy groups behind the captain. Melee fighters only work Krombruch on his back to avoid being hit by his counterattack. Also, when the boss has about 50% of his life energy, he’ll call two henchmen to help you kill them.
What is WoW Classic?
World of Warcraft Classic is a true recreation of the original WoW as you know it from 2006. All parts of the game – from combat mechanics and talent trees to character models and zones – have been recreated, contributing to the authentic experience.
Getting Started
All players with an active World of Warcraft subscription or game time on their accounts have access toWoW Classic at no additional cost.
- Open the Blizzard Battle.net Desktop App and select World of Warcraft from the menu.
- Select World of Warcraft Classic from the Version menu. If you have more than one World of Warcraft account, you’ll see a second Account drop-down list. In this column, select the active account you want to play with.
- Click the Install button. The progress bar will tell you when your game is ready to play.
- Click the Play button when the installation is complete.
You will need to select the realm you want to play on from several different realm types. Make sure you choose the same realm as your friends – in World of Warcraft Classic, you can only group with characters that are on the same realm as you!
Heroes&WIKI, WoW Classic, World of Warcraft Classic, WoW Classic Guide, WoW Classic Guides